Embark on a journey into the realm of Postman Automation, where the boundaries of efficiency and accuracy in API testing and beyond are pushed to new heights. In this comprehensive guide, we delve into the intricacies of Postman’s architecture, explore its diverse use cases, and unveil the secrets of crafting effective automated tests. Get ready to revolutionize your testing practices and unlock the full potential of Postman Automation.
As we delve deeper into the world of Postman Automation, we’ll uncover its strengths and limitations, empowering you to make informed decisions about its implementation. We’ll also provide invaluable best practices and guidelines to ensure your automation efforts yield maximum results. Join us on this exciting exploration and become a Postman Automation maestro.
– Elaborate on the architecture and components of Postman.
Postman’s architecture is designed to provide a comprehensive platform for API development, testing, and automation. It consists of the following key components:
- Collection: A collection organizes related API requests and allows for easy management and sharing.
- Request: A request represents an individual API call and includes details such as the endpoint, method, headers, and body.
- Environment: An environment stores key-value pairs that can be used to configure requests, such as base URLs, authentication tokens, and database connections.
- Runner: The runner executes requests and provides real-time results, including response status, headers, and body.
- Monitor: The monitor tracks the performance and reliability of APIs by executing requests at regular intervals and alerting users to any issues.
Getting Started with Postman Automation
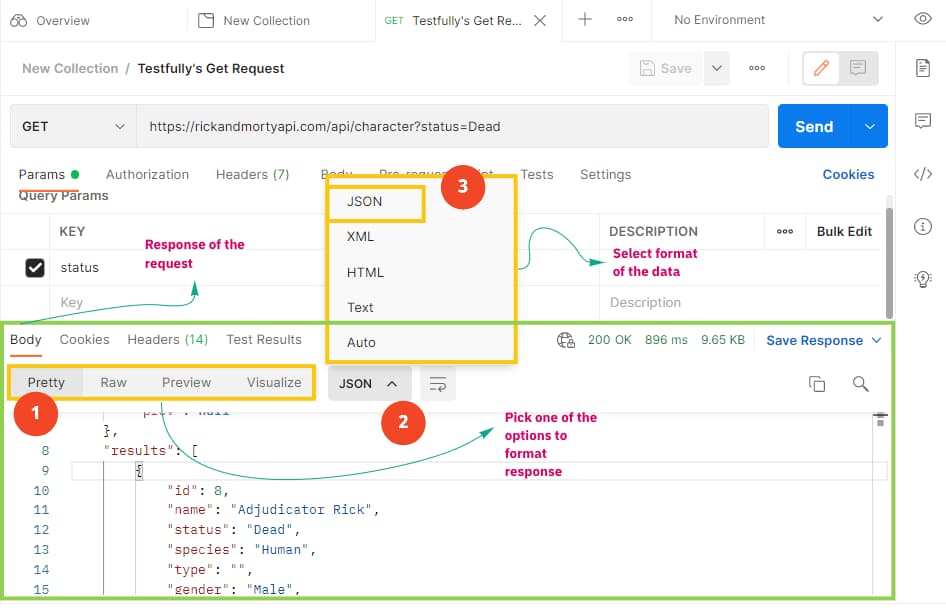
Postman is a powerful tool for API testing and automation. It can be used to create, run, and manage automated tests for APIs.
To get started with Postman automation, you will need to install the Postman app and create a Postman account. Once you have done this, you can begin creating automated tests.
The basic workflow of Postman automation is as follows:
1. Create a Postman collection that contains the requests you want to automate.
2. Create a Postman test script that defines the tests you want to perform.
3. Run the test script to execute the tests.
Postman provides a variety of features that make it easy to create and manage automated tests. These features include:
* A user-friendly interface that makes it easy to create and edit tests.
* A powerful scripting language that allows you to customize tests.
* A built-in test runner that makes it easy to run tests.
* A reporting system that provides detailed results of test runs.
Postman automation can be used to perform a variety of tasks, including:
* Testing the functionality of APIs.
* Validating the performance of APIs.
* Load testing APIs.
* Security testing APIs.
Postman automation can help you to improve the quality of your APIs and ensure that they are reliable and performant.
Here are some best practices for writing and maintaining automated tests in Postman:
* Use descriptive test names.
* Write tests that are independent of each other.
* Use parameterized tests to test different scenarios.
* Use assertions to verify the results of tests.
* Use logging to track the progress of tests.
* Regularly review and update tests.
If you are having trouble getting started with Postman automation, there are a number of resources available to help you. The Postman documentation provides detailed instructions on how to use Postman automation. There are also a number of tutorials and blog posts available online.
Creating Automated Tests
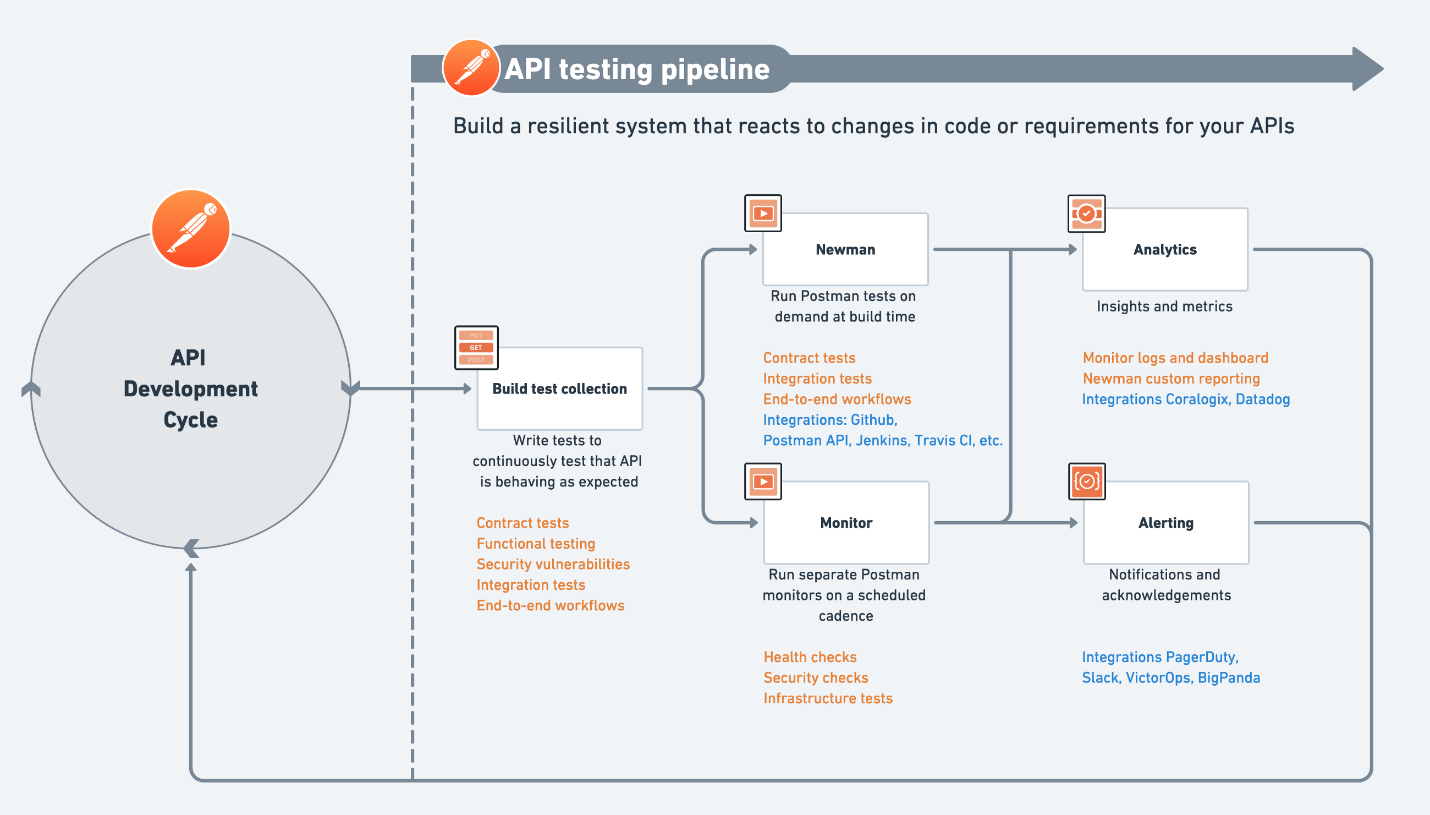
Automating tests with Postman streamlines the software testing process, enhancing accuracy, efficiency, and coverage.
Types of Automated Tests, Postman Automation
Postman supports various automated test types:
- API Testing: Verifies API functionality, behavior, and performance.
- Performance Testing: Assesses an API’s response time, throughput, and resource utilization.
- Security Testing: Identifies potential security vulnerabilities in APIs.
Creating and Executing Automated Tests
1. Create a New Test Collection: Organize tests into logical groups.
2. Add Test Cases to a Collection: Create test cases for specific scenarios.
3. Configure Test Settings: Set parameters such as environment, variables, and assertions.
4. Run Tests and View Results: Execute tests and analyze the results.
Benefits of Automated Tests
* Improved Accuracy: Automation eliminates human error, ensuring consistent and reliable testing.
* Increased Efficiency: Automation saves time and effort compared to manual testing.
* Enhanced Coverage: Automated tests can cover a wider range of scenarios than manual testing.
Challenges and Tips
* Maintenance: Tests require regular updates to reflect changes in APIs or test requirements.
* Resource Consumption: Automated tests can consume significant system resources, especially during performance testing.
Tips for Effective Test Scripts
* Write Clear and Concise Tests: Use straightforward language and avoid unnecessary complexity.
* Use Assertions Effectively: Clearly define expected results and compare them with actual outcomes.
* Handle Errors Gracefully: Anticipate potential errors and provide appropriate error handling mechanisms.
Postman’s Built-in Test Runner
Postman provides a built-in test runner for executing automated tests. It offers features such as:
* Parallel Execution: Runs multiple tests concurrently, reducing execution time.
* Detailed Results: Provides detailed reports on test execution, including success/failure status and response times.
Troubleshooting Failed Tests
* Review Test Script: Check for errors in syntax, assertions, or variable usage.
* Inspect Network Traffic: Use tools like Postman’s Interceptor to analyze network requests and responses.
* Check Environment Variables: Ensure that environment variables are configured correctly.
Third-Party Tools
* Newman: A command-line tool for running Postman collections from the terminal.
* Gatling: A performance testing tool that integrates with Postman.
* Katalon: A comprehensive test automation platform that supports Postman integration.
Summary of Automated Test Types
| Test Type | Advantages | Disadvantages | When to Use |
|—|—|—|—|
| API Testing | Verifies API functionality | Limited to API testing | Functional testing |
| Performance Testing | Assesses API performance | Resource-intensive | Load and stress testing |
| Security Testing | Identifies security vulnerabilities | Requires specialized knowledge | Security audits |
Example Automated Test Script
“`
tests[“API Request Test”] =
request:
method: “POST”,
url: “https://example.com/api/v1/users”,
body:
name: “John Doe”,
email: “[email protected]”
,
assertions:
statusCode: 201,
bodyContains: “User created successfully”
;
“`
Advanced Automation Features
Postman automation offers advanced features that enhance the capabilities of your automated tests. These features include data-driven testing, pre- and post-request scripts, and test assertions.
Data-driven testing allows you to execute your tests with different sets of data, making them more robust and reliable. Pre- and post-request scripts enable you to perform custom actions before and after each request, providing greater flexibility and control over your tests.
Data-Driven Testing
Data-driven testing involves parameterizing your test data and running your tests against multiple sets of data. This approach ensures that your tests are comprehensive and can handle various input scenarios.
You also can investigate more thoroughly about How To Automate Software Testing to enhance your awareness in the field of How To Automate Software Testing.
To perform data-driven testing in Postman, you can use the “Data” tab in the test editor. Here, you can define different sets of data and map them to your test variables.
// Example of data-driven testing in Postman
pm.test("Data-driven test", function ()
  const data = [
     username: "user1", password: "pass1" ,
     username: "user2", password: "pass2" ,
  ];

  data.forEach((user) =>
    pm.request("Login")
      .set("username", user.username)
      .set("password", user.password)
      .expect(200)
      .expect(pm.response.json().id, user.id);
  );
);
Pre- and Post-Request Scripts
Pre- and post-request scripts allow you to execute custom JavaScript code before and after each request in your test suite. This functionality provides you with the ability to perform complex operations, such as setting up test data, extracting data from responses, or performing additional assertions.
To use pre- and post-request scripts, navigate to the “Scripts” tab in the test editor. Here, you can write your JavaScript code and specify when it should be executed.
// Example of a pre-request script
pm.environment.set("username", "user1");

// Example of a post-request script
pm.test("Check response status code", function ()
  pm.expect(pm.response.code).to.eql(200);
);
Summary of Key Features
The following table summarizes the key advanced automation features in Postman and their benefits:
| Feature | Benefits |
|---|---|
| Data-Driven Testing |
|
| Pre- and Post-Request Scripts |
|
Test Monitoring and Reporting
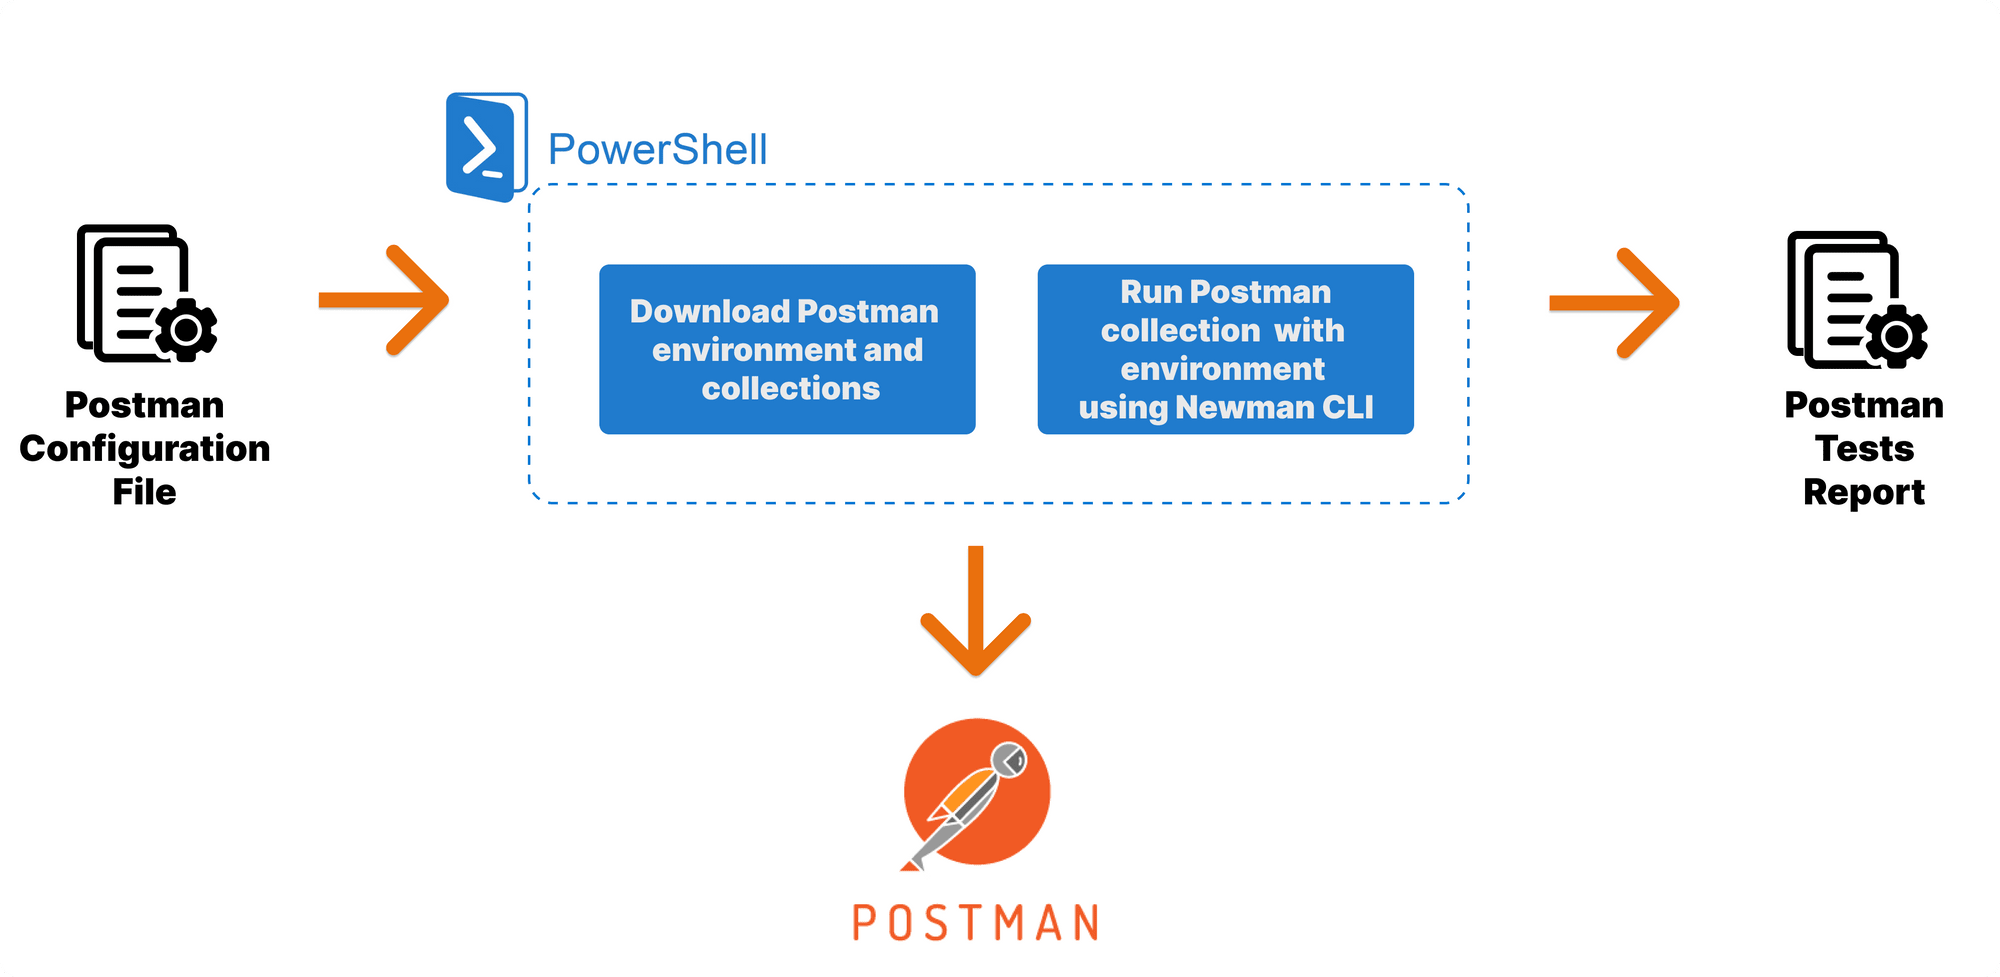
Monitoring and reporting automated tests are crucial for ensuring test reliability and efficiency. Postman provides several options for monitoring and reporting test results, enabling you to track test execution, analyze results, and identify areas for improvement.
Monitoring Test Execution
Postman’s Test Runner provides real-time monitoring of test execution. You can view the status of individual tests, as well as the overall progress of test suites. This allows you to quickly identify any failed or skipped tests, enabling prompt troubleshooting and resolution.
Reporting Test Results
Postman offers various options for reporting test results, including:
- Test Summary Report: Provides a high-level overview of test execution, including the number of passed, failed, and skipped tests, along with execution time and any errors encountered.
- Detailed Test Report: Presents detailed information for each test, including request and response details, assertions, and any failures or errors.
- HTML and JSON Reports: Generates reports in HTML and JSON formats, allowing you to easily share and analyze results with stakeholders.
Best Practices
To set up effective automated test monitoring and reporting systems, consider the following best practices:
- Establish clear reporting requirements and identify key stakeholders.
- Configure monitoring and reporting tools to meet specific needs.
- Regularly review test results and identify areas for improvement.
- Automate reporting processes to streamline and save time.
Postman API for Test Results
Postman’s API provides programmatic access to test results. You can use the API to retrieve and analyze test results in various ways, such as:
- Querying the API to get a list of all test results.
- Filtering results based on specific criteria (e.g., test name, status).
- Retrieving detailed information about a specific test result.
By leveraging Postman’s API, you can integrate test results into custom dashboards, reporting tools, or other systems, enabling more comprehensive analysis and reporting.
Integrations and Extensions
Postman offers a wide range of integrations and extensions to enhance its automation capabilities. These integrations allow you to connect Postman with various tools and platforms, enabling you to automate complex workflows and extend the functionality of Postman.
External Tool Integrations
- Jira: Integrate with Jira to create and update issues, track bugs, and manage project tasks.
- Slack: Send notifications, receive updates, and collaborate with team members through Slack.
- Azure DevOps: Connect with Azure DevOps to manage code repositories, build pipelines, and track project progress.
Postman Extensions
- Newman Runner: Execute Postman Collections from the command line, enabling automated testing from CI/CD pipelines.
- GraphQL Runner: Automate GraphQL queries and mutations, allowing you to test GraphQL APIs.
- OpenAPI Importer: Import OpenAPI specifications into Postman, simplifying the creation of automated tests for API endpoints.
Best Practices for Postman Automation
Follow these best practices to ensure your Postman automation scripts are effective and maintainable:
Organize your tests into collections and folders for better management and reusability.
Variable Management
- Use environment and global variables to store dynamic data and simplify test maintenance.
- Avoid hard-coding values in your scripts to make them more flexible and adaptable.
Test Design
- Design your tests to be modular and independent, allowing for easy maintenance and reuse.
- Use parameterized tests to handle multiple scenarios and reduce script duplication.
Error Handling
- Implement robust error handling mechanisms to ensure your scripts can recover from unexpected situations.
- Use try-catch blocks and assertion statements to validate responses and identify errors.
Documentation
- Document your scripts thoroughly, including descriptions, preconditions, and expected results.
- Use comments and annotations to explain the purpose and functionality of your code.
Maintenance
- Regularly review and update your scripts to ensure they are up-to-date and aligned with changes in the API or application under test.
- Use version control to track changes and collaborate with others.
Common Pitfalls
Avoid these common pitfalls when creating Postman automation scripts:
- Hard-coding values in your scripts, making them inflexible and difficult to maintain.
- Over-complicating your scripts, making them difficult to understand and debug.
- Neglecting error handling, leading to unreliable tests and false positives.
- Insufficient documentation, making it challenging to understand and maintain your scripts.
– Provide real-world examples of how Postman automation is used in various industries and applications.
Postman automation is used in various industries and applications to streamline and enhance API testing processes. Here are some real-world examples:
- Software Development: Postman automation helps developers create and execute automated tests for APIs, ensuring the reliability and functionality of software applications.
- QA and Testing: QA teams leverage Postman automation to automate API testing, saving time and resources while improving test coverage and accuracy.
- Performance Testing: Postman automation enables performance testing of APIs, providing insights into response times, throughput, and other performance metrics.
- API Documentation: Postman automation can generate API documentation from test scripts, providing a clear understanding of API functionality and usage.
- Continuous Integration/Continuous Delivery (CI/CD): Postman automation can be integrated into CI/CD pipelines to automate API testing as part of the development and deployment process.
Comparison with Other Automation Tools
Postman automation is a powerful tool for API testing and automation, but it’s not the only option available. Several other tools offer similar capabilities, each with its own strengths and weaknesses.
To help you choose the right tool for your needs, we’ll compare Postman automation with some of the other popular options on the market.
Strengths of Postman Automation
- Easy to use: Postman has a user-friendly interface that makes it easy to create and manage automated tests.
- Comprehensive: Postman supports a wide range of testing features, including API testing, performance testing, and security testing.
- Extensible: Postman can be extended with a variety of plugins and integrations to add additional functionality.
Weaknesses of Postman Automation
- Can be slow: Postman automation can be slow, especially when running large test suites.
- Limited support for parallel testing: Postman automation does not support parallel testing out of the box.
- Can be expensive: Postman automation is a paid service, and the cost can add up quickly for large teams.
Future of Postman Automation
The future of Postman automation is bright, with emerging trends pointing towards increased adoption and innovation. Postman is well-positioned to meet the changing needs of the automation landscape.
Integration with CI/CD Pipelines
Postman automation will become more tightly integrated with CI/CD pipelines. This will enable developers to automate API testing as part of their continuous integration and delivery processes, ensuring that APIs are tested and validated throughout the development lifecycle.
Artificial Intelligence (AI) and Machine Learning (ML)
AI and ML will play a significant role in the future of Postman automation. These technologies can be used to enhance test case generation, automate API documentation, and provide insights into API performance and behavior.
Low-Code/No-Code Automation
Postman is likely to embrace low-code/no-code automation capabilities, making it easier for non-technical users to create and execute automated tests. This will further increase the accessibility and adoption of Postman automation.
Collaboration and Sharing
Collaboration and sharing will become increasingly important in Postman automation. Postman is likely to introduce features that make it easier for teams to collaborate on automated tests and share them across projects and organizations.
Explore the different advantages of How To Write A Software Test Plan that can change the way you view this issue.
Cloud-Based Automation
Postman automation will move towards cloud-based solutions. This will provide users with the benefits of scalability, flexibility, and access to the latest features and updates.
Creating HTML Table in Postman

Postman offers robust scripting capabilities that extend its functionality, including the ability to create dynamic and interactive HTML tables. These tables can be used to organize and present data, making it easier to analyze and visualize.
To create an HTML table in Postman, use the following steps:
Creating the Table Structure
- In the “Tests” tab of your Postman request, create a new test script.
- Use the `table` function to create the basic structure of the table. The syntax is `pm.response.to.htmlTable()`. This function takes the response body and converts it into an HTML table.
Styling the Table
- To style the table, use CSS properties within the `style` attribute of the `table` function. For example, to set the border color, use `style=”border: 1px solid black”`.
- You can also add classes to the table and style them using CSS in the “Settings” tab of your Postman workspace.
Formatting the Data
- To format the data in the table, use the `html` function to wrap the data in HTML tags. For example, to bold a cell, use `pm.response.to.html().replace(/
(.*?)<\/td>/g, “ $1 “)`.
- You can also use the `json` function to convert the response body into a JSON object and manipulate the data before creating the table.
Using Blockquotes in Postman
Blockquotes are a powerful tool for improving the readability and structure of your Postman responses. They can be used to highlight important information, quote external sources, or simply break up large blocks of text.
Creating Blockquotes
To create a blockquote in Postman, simply use the `> ` character at the beginning of the line. For example:
“`
“message”: “> This is a blockquote.”
“`
This will create a blockquote that looks like this:
“`
“message”: ”
> This is a blockquote.”
“`
Best Practices
Here are some best practices for using blockquotes in Postman:
- Use blockquotes sparingly. Too many blockquotes can make your responses difficult to read.
- Use blockquotes to highlight important information. Don’t use them for every piece of text.
- Use blockquotes to quote external sources. This can help to give your responses more credibility.
- Use blockquotes to break up large blocks of text. This can make your responses easier to read and understand.
Writing Prompts
Here are some writing prompts to help you practice using blockquotes in Postman:
- Write a Postman response that uses blockquotes to format a JSON response.
- Write a Postman test that verifies the presence of a specific blockquote in a response.
Visualizing Data with Charts and Graphs
Postman’s data visualization capabilities allow you to create interactive charts and graphs to visualize API response data. This helps you quickly understand and analyze complex data, identify trends, and make informed decisions.
Find out about how How To Test Mobile Applications can deliver the best answers for your issues.
Types of Charts and Graphs
Postman supports a range of chart and graph types, including:
- Line charts: Display data points connected by lines, ideal for showing trends over time.
- Bar charts: Display data as vertical or horizontal bars, useful for comparing values across categories.
- Pie charts: Display data as slices of a pie, showing the proportion of each value to the whole.
- Scatter plots: Plot data points on a two-dimensional plane, showing the relationship between two variables.
- Histograms: Display the distribution of data points, showing the frequency of values within specified ranges.
Creating Charts and Graphs
To create a chart or graph in Postman, simply:
1. Select the response you want to visualize.
2. Click the “Visualize” button in the response panel.
3. Choose the desired chart type from the dropdown menu.
Postman will automatically generate the chart or graph based on the response data. You can customize the chart’s appearance, such as colors, labels, and axes, to enhance readability and clarity.
Creating Interactive Dashboards: Postman Automation
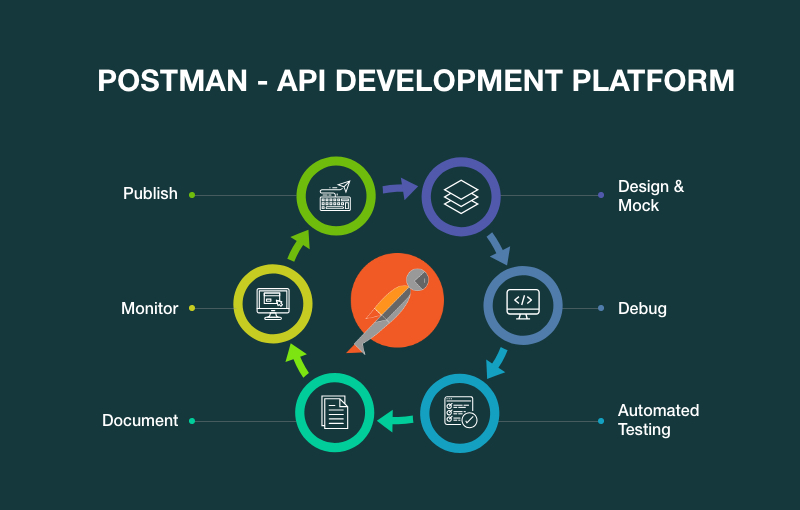
Creating interactive dashboards in Postman is a powerful way to visualize and interact with your test results. Using HTML and JavaScript, you can create custom dashboards that provide insights into your API performance, test coverage, and other metrics.
Postman provides a set of pre-built dashboard widgets that you can use to create your own dashboards. These widgets include:
* Charts: Display data in a variety of chart types, including bar charts, line charts, and pie charts.
* Tables: Display data in a tabular format.
* Gauges: Display a single metric as a gauge.
* Panels: Group widgets together into a single panel.
You can also use custom HTML and JavaScript to create your own widgets. This gives you the flexibility to create dashboards that are tailored to your specific needs.
To create an interactive dashboard in Postman, first create a new collection. Then, click on the “Dashboards” tab and click on the “New Dashboard” button.
In the “Dashboard” editor, you can drag and drop widgets onto the canvas to create your dashboard. You can also customize the widgets by changing their properties.
Once you have created your dashboard, you can share it with other team members. To share a dashboard, click on the “Share” button and enter the email addresses of the people you want to share it with.
Interactive dashboards are a powerful way to visualize and interact with your test results. They can help you to identify trends, track progress, and make informed decisions about your API development.
Closing Notes
Our exploration of Postman Automation concludes with a resounding affirmation of its transformative power. By embracing its capabilities, you can streamline your testing processes, enhance accuracy, and free up valuable time to focus on innovation. Whether you’re a seasoned tester or just starting your automation journey, Postman Automation holds the key to unlocking a world of possibilities. Embrace it, master it, and witness the profound impact it can have on your testing endeavors.
Common Queries
What are the key benefits of using Postman Automation?
Postman Automation offers a myriad of benefits, including increased efficiency, enhanced accuracy, improved test coverage, reduced manual effort, and the ability to perform complex testing scenarios with ease.
How does Postman Automation compare to other automation tools?
Postman Automation stands out with its user-friendly interface, intuitive workflow, and extensive ecosystem of integrations. It provides a comprehensive solution for API testing and beyond, making it a popular choice among developers and testers alike.
What are some common challenges faced when using Postman Automation?
While Postman Automation is a powerful tool, it’s not without its challenges. Some common hurdles include managing large test suites, ensuring test stability, and handling complex data scenarios. However, with careful planning and the right strategies, these challenges can be effectively overcome.

